Tuesday, 28 February 2012

Cuckoo Clock

It's time to create another project using Kelleigh Ratzlaff's cutting files. I designed a cuckoo clock using the Bird house cutting file. 


I opened the svg file in my Silhouette Designer Software and removed the circle so as not to cut a circle in the house. I cut the template on cardstock using my Cameo.
I cut a small window in the top part of the front panel for the bird and then decorated the house with rub-ons.
I cut the roof template out of cardstock using the Cameo.
To add some trees and characters, I had to adhere the house to a square block. For this, I cut the lid part of a 3d box that is available at the Silhouette Online Store. I then adhered the house to the lid using paper glue.
I printed some forest characters using my colour printer and cut it out and adhered it to the lid. I used the Cameo to cut out two 3d-christmas trees and glued it to the lid as well. I made the yellow bird using air dry clay. I printed the clock face clip art on my printer and the dials were adhered using a brad.
What is a cuckoo clock without pine cones? I used the Cameo to cut out two 3d ornaments and fastened a piece of twine to the top part of the ornament. 
To hang the pine cones from the clock, I attached the twine to the lid by pulling it through the bottom using a needle and making knot so as to prevent it from slipping through the hole.

The final step was to attach the roof to the house. I decorated the roof using a rubber stamp and some black ink.
This was the end result:


Happy Crafting!


Weekend in the Bush

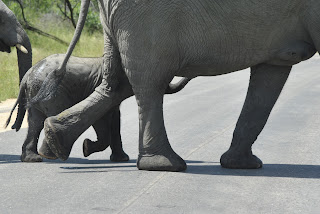
We spend the weekend in the Kruger National Park with Terence's family. It was extremely hot in the Lowveld but the time out of town did us both good! For any of you that's experienced the Kruger Park, you will know that the experience is well worth it if you can come back saying that you saw the big five. So our experience was well worth it! :-)

The weekend was all about taking photos with my new zoom lens and I ended up with some nice photos if I may say so myself. The photos of the lions were taken on the first evening when we took a drive before the gates closed. The gates closed at 18:30 and we came across these two male lions at 18:15 and it was still a bit of drive to the camp from where we found them. We could not spend too much time admiring them, but I managed to take some awesome close-ups.


Is nature not amazing???!!!


Have a great week!

Monday, 20 February 2012

Happy Monday

What a busy weekend!!! My boyfriend's  (Terence) sisters came to visit all the way from the Isle of Man and the family had a get together on Saturday. We had a braai (more commonly known as a barbecue) and just had such a nice time catching up with the family.


As a result I had very little time to craft and when I sat down in my studio on Sunday, I just knew I had to finish at least one project so that I can feel I at least accomplished something. Since I became part of Kelleigh's creative team, I have all these ideas in my head of what I want to make with her cutting files, so when I get time to sit down and craft, I just can't stop until the project is complete. Her files are so easy to use that it does not take long to assemble the template! 


The cupcake shaped box, which is the most popular cutting file in her shop, was on my list of projects to assemble. When Kelleigh send me an email informing me that I have been chosen to be part of the team, she stated that she wants new members to play with her templates in unique ways. I then decided to turn this cupcake shaped box into a carousel using my Silhouette Cameo.


I started off by importing the svg file into the Studio Designer Edition. I then cut it using the Cameo.


After it was cut, I removed it from the cutting mat and cut the base part (cup) from the top part. I assembled the two pieces separately. Below is the cup after I assembled it. 

I cut a small hole in the top of the cup where I can insert the pole to which I attached the roof (cake) of the carousel.
To make the pole, I used a straw and cut it to the desired length. Taking a piece of ribbon, I wrapped it around the straw.
I inserted the wrapped straw into the hole I cut in the cup (see above).
For the horses, I used the print and cut feature of the Cameo. I imported a carousel horse clip art into Cameo, traced the shaped and grouped the cutting lines and picture. 

These images were now ready to be printed and cut.
I adhered the horses to toothpicks, which I painted and inserted into the top of the cup.
I assembled the roof of the carousel and decorated it with rhinestones and flags. The flags is a shape from the Silhouette Online Store and was cut using the Cameo. I cut a few rosettes with the Cameo and adhered it to the sides of the cup. I attached the roof to the pole using my hot glue gun.

The end result: 


I hope this inspired you to go and try new things with Kelleigh's designs. They are so versatile and fun to play with!

Happy Monday and thanx for stopping by!

Supplies used:
Paper: Trim Craft - Bird Song
Cardstock: Bazzill Basics
Glue: Heritage Scrapbook Glue

Wednesday, 15 February 2012

Milk Carton and Announcement

A few days ago I came across a Team Members Call to work with Kelleigh Ratzlaff's designs. I sent her my application with a couple of pictures of my favorite projects. Kelleigh replied to my application right away and invited me to join her team!! How exciting! I am thrilled to be working with her files. 

My first project was the milk carton file from her store. For this project I used the New Leaf paper from Trim Craft. I altered it to create a mixed media project. I played around with various techniques as taught by Christy Tomlinson in her She Art workshops.


I started of by applying modge podge to the paper after cutting the template out with the Silhouette Cameo. Can I just say this machine is my new obsession!!! I then used some acrylic paint to create the colour wash effect of the background. I played around with various stamps and rub-ons. The final touch was adding the two girls.


This was a really fun project and can't wait to play with the next cutting file!


And last but not least....a special thank you to my friend Tania for designing the gorgeous  logo for my craft business - she is truly brilliant at what she does!