Monday 3 December 2012

Christmas Cards

I am one of those people that believes in only giving handmade greeting cards and what better time of year to share these cards then Christmas? What made the creation of my cards so exciting but difficult at the same time, was that I'm part of the Jessica Sprague Creative Team so I had access to all these amazing designers but which designer's Christmas Collection do I use????

I love the look of vintage Christmas collections and my favorite one to create with this year was Echo Park This & That Christmas by designer Lori Whitlock. This collection can be purchased here.


I used my Silhouette Cameo to cut the card shape and the print & cut feature to cut the elements.
I challenge you to create your own Christmas cards this year - there are so many amazing collections out there and the people you give it to, appreciate them more!

Happy crafting!


Saturday 18 August 2012

DigiChick Homecoming Parade Float

If you follow my blog, you would have noticed that I love creating 3D hybrid projects and I always turn to that type of craft when I need some inspiration.
You can imagine my excitement when Lu-Ann from the The Hybrid Chick asked if I could be a guest blogger on their blog and that my my first project will be to create a homecoming float.

Her instructions to me were to use a combination of templates from Kelleigh Ratzlaff (as I am one of her creative team members) and papers & elements from only one designer in The Digichick Shop. I chose to work with Designs by Dani and opted for a "Under the Sea"-theme.

This is what I came up with:


What a fun project - it really got my creative juices flowing!

Supplies and templates used:
- Digital Die-cutting machine: Silhouette Cameo
- Paper: Mermaid Lagoon by Megan Turnidge
- Cutting files: Cupcaked-shaped box; Pinwheels; StarSpangled; Sweet Strawberry set - Kelleigh Ratzlaff
- Cardstock: American Crafts

Hop on over to the DigiChick forum for some great specials and enjoy the rest of the parade!

Happy crafting!

Thursday 16 August 2012

Shrink Plastic

I recently discovered the magic of Shrink Plastic and have been creating my own jewelry pieces and pinned some great examples on my Pinterest boards. This is super fun for young and old!!

Here are some of the jewelry I created:
Pendant
 Pendant
 Pendant and earrings
 Earrings
And to follow some ideas on my Pinterest board: http://pinterest.com/vdberro/jewelry/

Happy Crafting!


Monday 6 August 2012

I'm back....

Today I want to share a mini album I created using the Echo Park Everyday Eclectic collection that will be released in Jessica Sprague's website next week. This album was so easy to create as I just glued 6 pieces of pattern paper back-to-back and created a cover to cover the album.

I cut the elements using the print and cut feature on my ever trusting Silhouette Cameo.


Hope you have a wonderful and creative week!

Happy crafting!

Wednesday 30 May 2012

Hot Air Balloon

Today I'm sharing a project I created using one of Kelleigh Ratzlaff's templates and paper & elements from a new designer at Jessica Sprague - Designs by Dani.

For this project, I used Kelleigh's Perfect Pumpkin Cutting file.

I used my Silhouette Cameo to cut the SVG file. I resized the lid and bottom so that the lid will be larger than the bottom. The lid will form the balloon part of the project and the bottom will be the basket.


I folded the pieces using the score lines and glued them together. I then cut 6 pieces of thin wire (about 4" each) and glued bakers twine to each piece. The next step was to glue these bakers twine wires to the inside of the bottom piece. This will form the suspension cables of the project.


I then glued these wires to the lid so that the top piece will be suspended from the bottom piece. The final step was to decorate the project with embellishments - I used the print and cut functionality of the Cameo for this.


And the end result......a HOT AIR BALLOON!!!


Supplies used:- Pumpkin shaped box by Kelleigh Ratzlaff Designs
- Paper and embellishments by Designs by Dani (Coming soon at Jessica Sprague)
- 3D clouds by Snapdragon Snippets
- Silhouette Cameo
- Heritage Scrapbook Glue
- Bakers Twine


Happy crafting!

Wednesday 9 May 2012

JS Greeting Cards

My favorite project to make is greeting cards as it's so quick and easy to complete. For this week's Jessica Sprague (JS) Creative Team submission, I chose to make a shadow box card and a greeting card using Nancie Rowe Janitz's (NRJ) paper collections.

Shadow Box Card
I used NRJ's Retro Spring paper to make the card and decorated it with the Retro Spring elements. My Silhouette Cameo was once again the magic tool as I used the print & cut feature for the elements.


Supplies used:
- Paper: Nancie Rowe Janitz Paperset and Elements;
- Rub-ons: Basic Grey;
- Chalk: Colorbox, Chestnut Roan;
- Glimmer Mist: Carole's Shimmer Magic;
- Digital Die cutter: Silhouette Cameo;
- Cutting file: Shadow Box Card by Alaa'K

Greeting Card
I made a second card using Nancie Rowe Jantiz's April Showers Paperset


Supplies used:
- Paper: Nancie Rowe Janitz April Showers Paperset;
- Punch: Martha Stewart;
- Digital Die cutter: Silhouette Cameo;
- Cutting file: 3D cutout flower by Alaa'K


Happy Crafting!


Thursday 3 May 2012

Jessica Sprague Design Team

I was recently selected to join the Jessica Sprague Design Team!!! Yeah!!! This made me realize once again that I truly have a passion for creating art/crafts and sharing this with others!! You can say I'm getting quite addicted to it....;-)


For the month of May, I was assigned to the designer, Nancie Rowe Janitz and my job as part of the team is to promote her products and new releases for the month. This girl is super talented and I must say I was very privileged to be allocated to her as I share her love for mixed media and painting.


I chose to create a mini album using Nancie's new background papers.


Supplies:
- NRJ Scrapart 4 Playful Painting Backgrounds;
- HP Everyday Photo Paper;
- Scrapbook King rub-ons;
- Bazzil Basics cardstock;
- Self-adhesive Transparent film;
- Silhouette Cameo;
- Samantha Walker Designs, 2 page book card


Happy Crafting!


Wednesday 25 April 2012

Blog Hop: Kelleigh's Seed Packet Card

Hi everyone and welcome to my blog!!! Today I'm taking part in the Kelleigh Ratzlaff's Seed Packet Card blog hop. If you are coming from Rachel's blog, you are in the right place.  If you've just stumbled upon my post, then I'd love it if you'd start at the beginning, HERE.

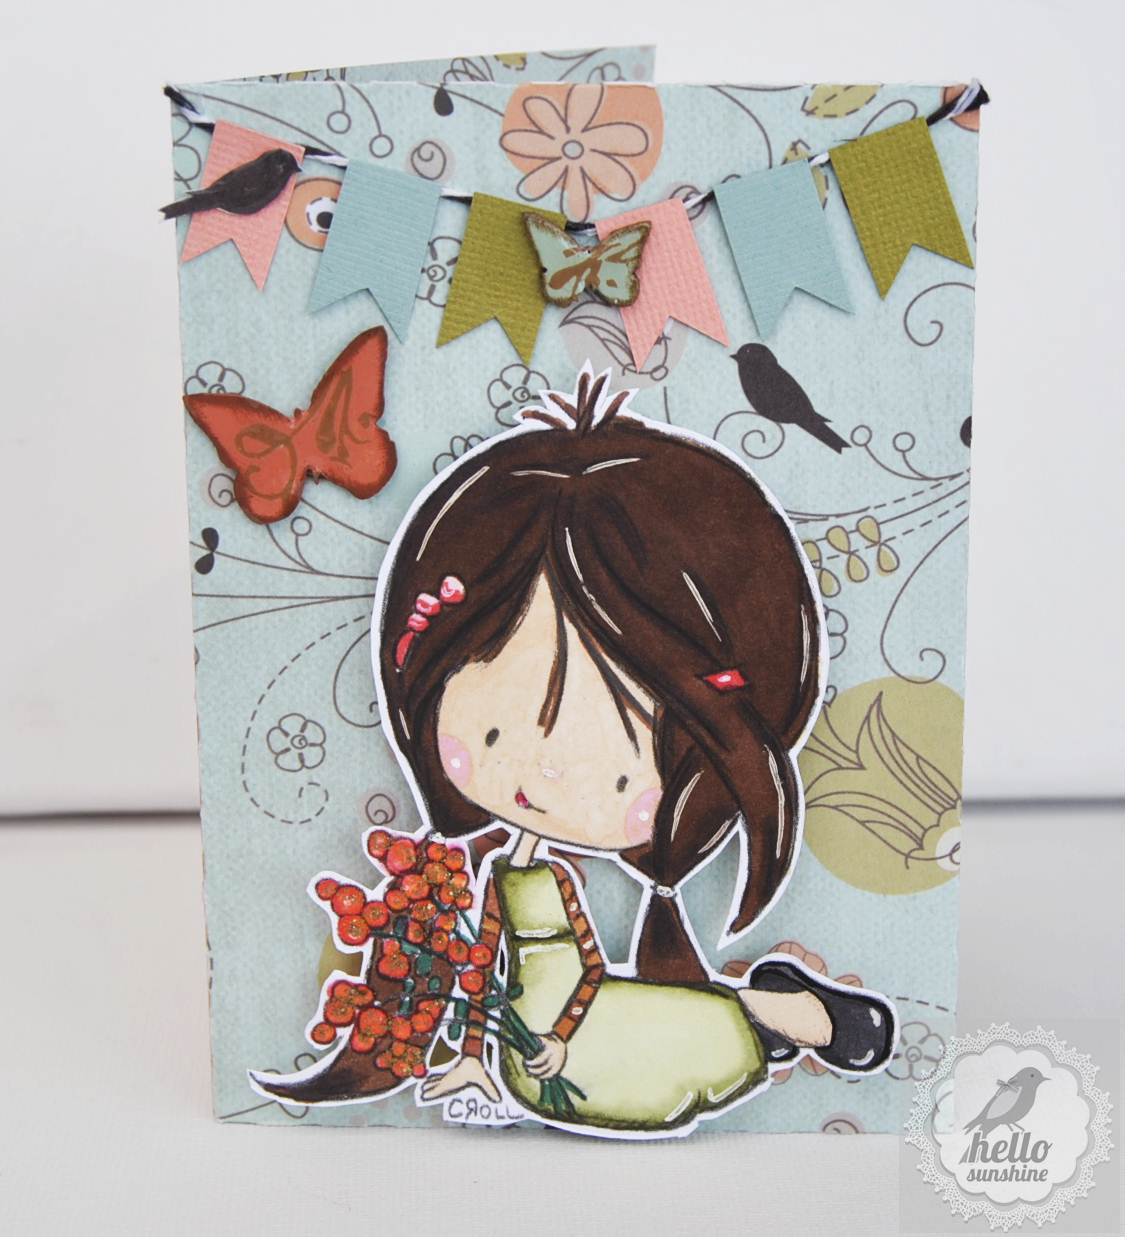
This blog hop features a sneak peek at one of Kelleigh's new paper craft templates. You can enjoy a great line up with some amazingly talented ladies and the AWESOME designs of this new file in the hop, then you can go create your own project and post it on facebook. The file can be purchased here. This card is so versatile and easy to assemble and can be used for any occasion. Here's my card and the supplies I used to create this card:

Used the Silhouette Cameo to cut the template:


Print and cut in Silhouette Cameo:
Front of card:

Inside of card:

Supplies:
- Template: Kelleigh Ratzlaff Seed Packet Card
- Patterned Paper: Trim Craft (First Edition New Leaf)
- Chipboard Butterflies: Scrapbook King
- Digital stamp: Tiddly Inks (Wryn Spring Bling)
- Alcohol ink markers: Spectrum Noir
- Doily: Doily lace by Jamie Koay - Silhouette Online Store
- Paint: Making Memories
- Cardstock: Bazzil Basics
- Glue: Heritage Scrapbook Glue

Here's what you need to do for a chance to win one of two $10 gift certificates to Kelleigh's store. Become a follower of my blog and please leave me a comment with your e-mail address and if you have a blog, include your blog address in the comment. I'd love to visit and become a follower of you, too! 

Alright, it's time for you to head over to Donna's blog to see what she created. Remember: the more blogs you comment on, the more chances you have of winning. The deadline for comments is Thursday, 26 April 2012 at 9pm Eastern Time.

Here's the blog hop lineup, just in case you get lost along the way: 
Kelleigh Ratzlaff - http://kelleighratzlaff.com/
The Hybrid Chick/Pattie - http://www.thehybridchick.com
Ria - http://www.dragonmagic.nl/
Nikki - http://onefaithfulstep.blogspot.com
Andrea - http://www.boyerville.net/
Rabogner - http://rcbogner.blogspot.com/
Roelien - http://hellosunshinecreations.blogspot.com/ You are here
Donna - http://scrappydonna.blogspot.com/ Next stop
Cathy - http://scrappycath.blogspot.com/
Elise - http://elisespieces.com
Ceci V - http://www.craftinginthenight.com/
Michelle P - http://ladyofleisureink.blogspot.com/
Joana - http://joanastamps.blogspot.com

Thanks so much for taking the time to hop with me today!

Happy Crafting!

Sunday 1 April 2012

Boys and their Toys

I'm back with another project using Kelleigh Ratzlaff's templates and I actually used more than one template this time. The most challenging part was making something for the boys this time around.


I started off by selecting the mini mailbox template and asked myself what can I make with this shape. And the most obvious choice was either a train or a tractor. I opted for the tractor project. I used the following templates from Kelleigh's designs:

1. Mailbox:
I imported the svg file into my Silhouette Designer Edition software and ungrouped all the shapes in this file. I deleted all the other shapes and only cut the box part of the template.


I glued the box together and set this aside for the front part of the tractor.


2. Tall box
I Once again imported the svg file into my software and resized it to match the size of the mailbox that I cut in the previous step.


I cut windows on each side of the box to resemble the shape of windows of a tractor. I glued the pieces together and this formed the back part of the tractor.


3. Wheels
For the wheels, I used the pumpkin cutting file. I imported the svg into my software and cut two sets to form the back wheels - which was larger than the front wheels. 


I resized the svg to cut smaller wheels for the front. 


4. Assemble
Once I cut all the pieces and assembled them, I then started assembling the tractor by glueing all the pieces together. I then added the finishing touches by creating a spoiler and yellow round lights for the front, a steering wheel, two rear view mirrors, a seat and stairs for the side of the tractor.


Once again, this project was proof that Kelleigh's templates are so versatile and can be used to create ANYTHING. The only limitation is your imagination!!!! 


Have a blessed week!


Happy crafting!!!